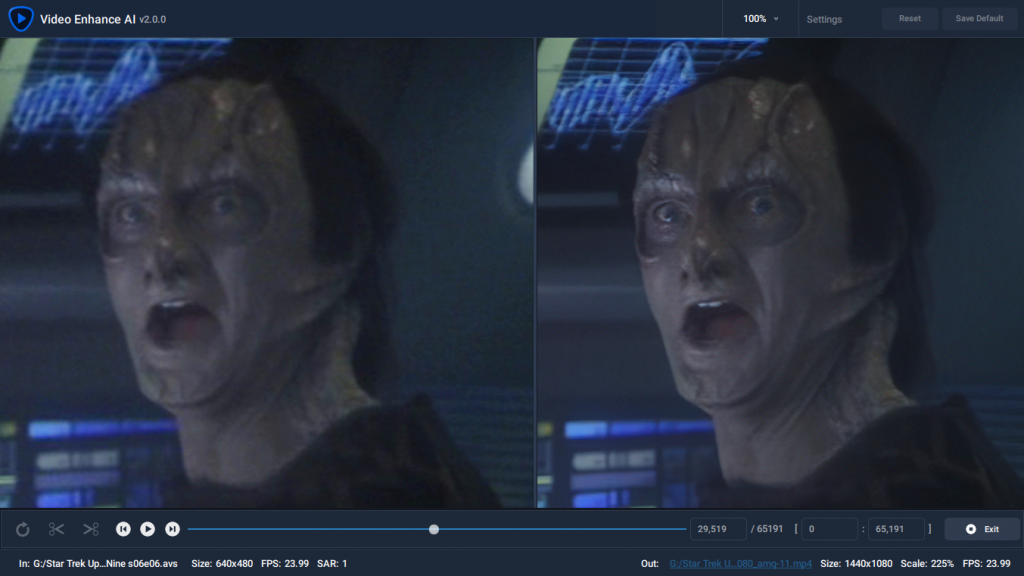
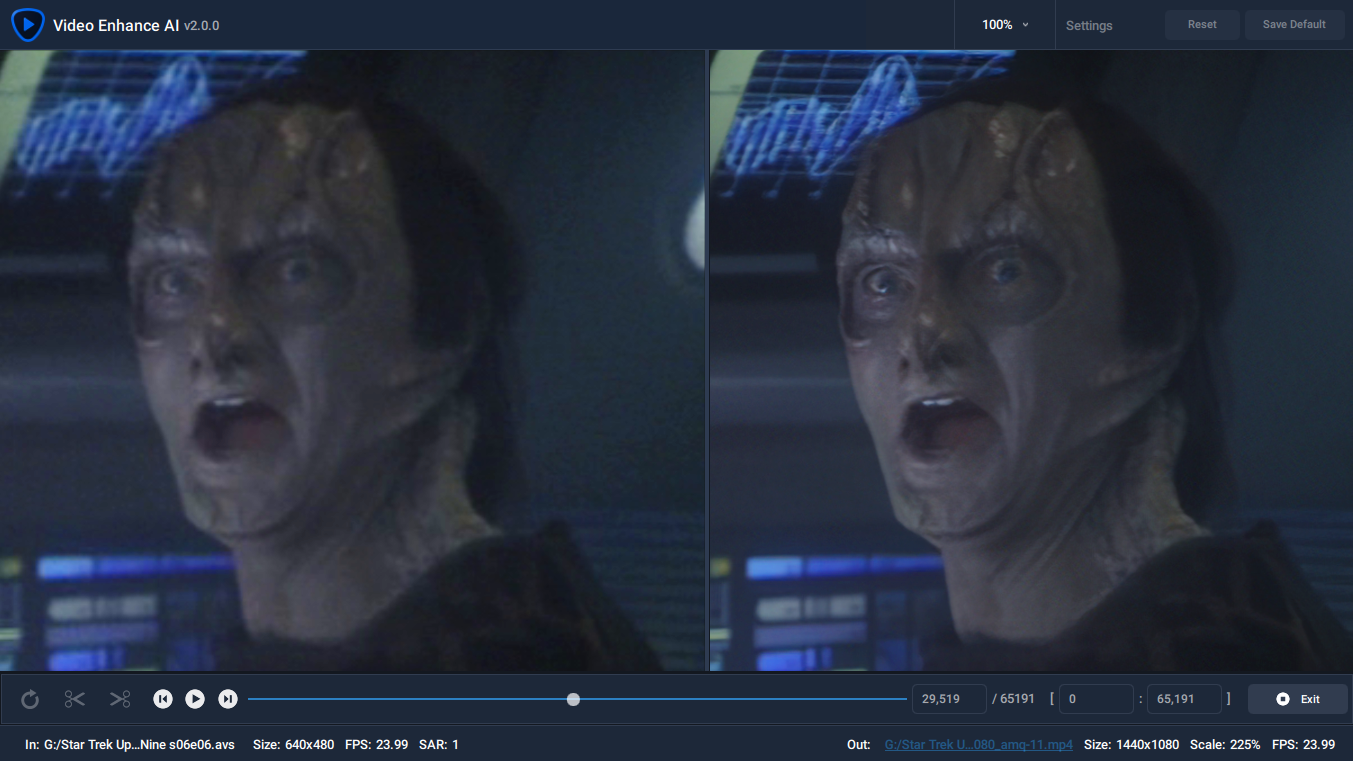
When I came across a Star Trek Voyager clip on YouTube that had been upscaled using artificial intelligence I nearly jumped out of my pants. The officially available viewing experiences of Star Trek Deep Space Nine and Voyager are lackluster to say the least. I immediately began scouring the internet to discover how I too could upscale my DVDs in a similar fashion. Thus began my Star Trek Upscale Project.
I commented on the YouTube video to see what software they used and was pointed to Topaz Labs Video Enhance AI (VEAI) and also came across a series of articles and a guide on ExtremeTech that explained their process and gave me a pretty good head start. I purchased VEAI and set about trying to upscaling my DVDs.
Unfortunately my Nvidia 970M powered laptop was not up to the task. So as I waited for the software and my computer to get better, I worked on trying to solve some of the problems I saw with the upscaling process. Note that my testing is not exhaustive and I’m a complete noob to AviSynth which is used for most of the pre-upscale grunt work. Spoiler alert: I built a new computer for unrelated 3D work and lucked out in getting a retail priced RTX 3070 from BestBuy.
What appears below is some of what I’ve come to learn, a verbose yet only mildly thorough how to, and occasional snark. Now off to the races.
The Quick and Dirty
For those already familiar with the general requirements and software used in these types of undertakings, here is a quick overview of the workflow I devised. Each step is elaborated upon further down.
Step 1: Rip to ISO with DVD Decrypter.
Step 2: Reauthor DVDs to individual episode folders with no compression or transcoding with DVD Shrink.
Step 3: Set .avs template options for two pass TIVTC.
Step 4: Index episodes, extract AC3 audio, and create .avs file with DGIndex.
Step 5: Run analysis pass in VirtualDub.
Step 6: Edit .avs files to remove first pass and uncomment second pass.
Step 7: Upscale episode with Video Enhance AI to PNG image sequence.
Step 8: Reassemble image sequence to video file in Davinci Resolve.
Step 9: Compress reassembled video to HEVC in Handbrake.
Step 10: Multiplex HEVC video, AC3 audio, and VFR timecode with MKVToolNix.
While there look to be a lot of steps, I have been doing one season at a time fairly quickly. Steps 1-6 are relatively painless and can be done for the whole season in one shot as they don’t require a lot of disk space. I imagine the process could be streamlined even further if one knew command line batch programming but that person is not me. Feel free to share if you are. I will describe each step in greater detail below and will give the settings that I’ve used but I won’t describe installation and setup of these programs as there are many tutorials out there that describe installation much better than I can. I will leave that for you, dear reader, to discover on your own.
For reference I am using a custom built Windows 10 PC with an Intel i9 10850K, 64GB RAM, Nvidia RTX 3070 FE, and a 1TB SSD for working storage.
The Hybrid Problem
Both Voyager and Deep Space Nine were shot on film at 23.976 frames per second. However, NTSC DVD standards require a frame rate of 29.97 fps. So like many shows of the time they had to employ some kind of telecine to interlace frames and convert 23.976 fps to 29.97 fps. This can be achieved by hard telecine or soft telecine. Either way the video needs to be deinterlaced for it to be properly upscaled using VEAI. Thankfully the DVDs were soft telecined which is easier to achieve good results by converting the footage back to it’s original 23.976 fps.
Of course it couldn’t be that simple. The special effects sequences were filmed at 29.97 fps and did not require telecining as they were already at the correct frame rate. So we are left with portions of the DVDs that are true progressive frames and portions that are interlaced resulting in a hybrid DVD.
There are many ways to deinterlace hybrid DVDs. The guide above uses a slightly different method than I decided to use. Much like Tuvix, I decided to try and separate and restore the 23.976 fps sections to their original progressive frames and leave the special effects sections at their 29.97 fps. Seeing as MKV supports variable frame rate, this shouldn’t be too difficult. If I understand correctly, this should preserve the original motion of both the film and special effects sections and minimize any jerkiness that could occur when lowering the frame rate of the special effects to match the film’s. This requires a two pass AviSynth process using the TIVTC plugin.
The Software
The only paid software used is Video Enhance AI. The rest of the programs are free or open source.
DVD Decrypter
Rips DVDs to an ISO for easier file handling.
DVD Shrink
Reauthors episodes to individual .vob files for easier indexing and file handling.
DGIndex
Creates index for AviSynth and extracts audio. Portable program. Does not require installation.
AviSynth+
Serves the DVDs directly into VEAI. I chose AviSynth+ for it’s easier multithreading and 64-bit support.
TIVTC filters
Detelecines footage and exports variable framerate timecode.
QTGMC filter
Helps smooth interlacing artifacts and missed frames.
VirtualDub2
Used for for first pass of TIVTC filter. Portable program. Does not require installation.
Atom
Text editor to edit .avs files.
Topaz Labs Video Enhance AI
Does the AI magic to make our beloved shows look the best they can.
DaVinci Resolve
Used to sharpen and convert image sequence back to video file.
Handbrake
Compresses video to HEVC for final storage.
MKVToolNix
Multiplexes video and audio with new timecode.
The Nitty-gritty
STEP 1 (DVD Decrypter)
Rip DVDs with DVD Decrypter and save as ISO files.
STEP 2 (DVD Shrink)
Extract each episode and reauthor it to it’s own DVD folder.
This will not transcode or compress the video, only extract the desired episode and save it to its own file.
- First choose Edit > Preferences > Output Files. From here uncheck ‘Split VOB files into 1GB size chunks.’ This makes file handling easier in the next step.
- Choose File > Open Disc Image… and open one of the ISO files you saved in the previous step. It will analyze the DVD.
- Choose Re-author from the top menu icon and then DVD Browser tab. Drag an episode from the Main Movie section at the right to the DVD Structure section at the left. They will be the files approximately 45:00 long or 1:30:00 long for two part combined episodes.
- Under the Compression Settings tab change Automatic to No Compression and uncheck any audio tracks you don’t want in your final video file. I only keep the 5.1-channel. Click Backup!
- Select backup target: should be Hard Disk Folder. Then choose where you would like to save the files. You should create a separate folder for each episode. I name mine VOY s01e01, VOY s01e03, etc.
- Click OK.
Repeat 345 more times 😀
STEP 3 (Atom)
Open the template.avs file inside the DGIndex folder with Atom or your favorite text editor. Edit it to look like this:
mpeg2Source("__vid__")
SetFilterMTMode("DEFAULT_MT_MODE", MT_MULTI_INSTANCE)

#Pass 01
tfm(d2v="__vid__", output="tfm.txt")
tdecimate(mode=4, output="metrics.txt")

#Pass 02
/*
tfm(d2v="__vid__", input="tfm.txt")
tdecimate(mode=5, hybrid=2, cycleR=1, vfrDec=0, input="metrics.txt", tfmIn="tfm.txt", mkvOut="timestamps.txt")
QTGMC(Preset="Very Slow", InputType=2, SourceMatch=3)
Crop(8, 0, 704, 480).BilinearResize(640, 480)
*/

Prefetch(4)
If you don’t care about what’s happening in the .avs file above you can skip down to Step 4. This only needs to be done once 🙂
This is where the DVD deinterlace and resize settings are entered. You can read about the TIVTC filter here. Since this is a two pass process the second pass is commented out and will later be uncommented. I have found that while TIVTC does well it occasionally misses a frame at a scene cut, and edges along text can sometimes need improvement. Adding the QTGMC filter after the TIVTC filters during the second pass helps smooth out these edges and repairs the missed frames.
Now, as for aspect ratio….
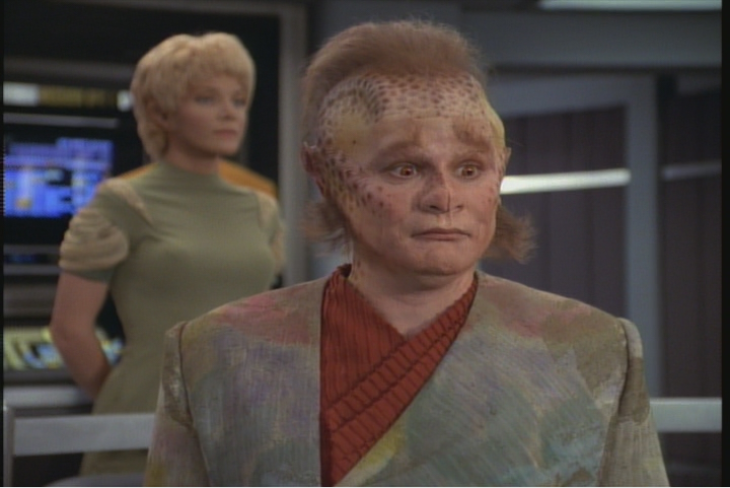
AviSynth does not support adding an aspect ratio so serving the video directly to VEAI results in a 720×480 file. This was all well and good and initially is what I went with. Then, when I went to correct the aspect ratio in Resolve I had a choice of pixel aspect ratios (PAR): NTSC (0.91) or NTSC DV (0.89). After setting my timeline dimensions to 1440×1080 and the clip’s PAR to NTSC DV the black bars on the right and left of the frame (see above) were still visible. When I changed the clip’s PAR to NTSC they were cropped off and matched almost perfectly with the 4:3 screen aspect ratio (SAR) of 1440×1080.
This lead me to believe that the 0.91 PAR was indeed correct. Unsatisfied and unsure I went reading around the internet some more and found the Wikipedia article on pixel aspect ratio. In the section on digital-to-analog conversion it explains the 10:11 (0.91) PAR used and in the next section how a 704 pixel width is used to contain the 4:3 picture. This all lined up with what I had already observed.
Exporting with all these resize changes in Resolve slowed the export considerably though and I wondered if I could resize and crop with AviSynth before serving it to VEAI. Since AviSynth uses CPU processing and VEAI uses GPU, I found I could correct the pixel and screen aspect ratios in AviSynth before serving it to VEAI without the upscaling process taking a performance hit.
First I needed to crop from 720×480 to 704×480, removing the black edges, and then use the 10:11 (.91) ratio and resize to the final 640×480 frame dimensions. As for whether or not to leave the 704×480 pixel dimensions and then set a SAR of 10:11 in the final MKV, I decided to convert it to square pixels to save file size, which could add up after 346 episodes and for 1:1 compatibility with modern displays.
In AviSynth the crop is expressed with four variables (x-offset, y-offset, x-width, y-height). To center the crop the x-offset needs to be half the difference of the two sizes (720 – 704 = 16). So an x-offset of 8 will center the crop. Once cropped the image can be resized to the final 4:3 SAR of 640×480 using BilinearResize (x-width, y-height).
Do note that the scene is not always perfectly centered in the 720×480 frame. From scene to scene it shifts slightly right or left, particularly in the earlier seasons of the shows when more analog processes were used. This results in occasionally seeing remnants of the black bar along the side but short of cropping shot by shot there is nothing to be done.
STEP 4 (DGIndex)
Index each episode, export an .avs file to use with AviSynth, and extract audio.
- Open DGIndex and drag the VTS_01_01.VOB file from the VIDEO_TS folder into the program. Click OK.
- Choose File > Save Project. It will default the the VIDEO_TS folder of the .vob file. I save it up one level in the episodes main folder. Click Save and it will quickly process the episode.
You should now have an .avs, .d2v, and .ac3 file in the episode folder. Repeat 345 more times 🙃
STEP 5 (VirtualDub)
Run the first analysis pass for AviSynth.
- Open VTS_01_1.avs in VirtualDub.
- Choose File > Run video analysis pass.
VirtualDub will now analyze the episode. On my system it takes between 6 and 7 minutes per episode. The required tfm.txt and metrics.txt files are created but remain empty until the program is closed. Once the analysis is complete close the program and the files will be updated to include the analysis. Do not scrub through the video before or after the analysis. Multiple instances of VirtualDub can be opened at once. I will usually process 8 episodes at a time. Repeat 345 more times 😐
STEP 6 (Atom)
Uncomment Pass 02 and comment out Pass 01.
If you have done steps 1-5 for all the episodes of a season you can batch edit all the .avs files for the season at once.
- Open Atom and click Add folders. Select the folder containing all the episodes you wish to edit (note this will edit files in child folders as well). The Project window should now list all your episode folders.
- Choose Find > Find in Project.
- Type /* in the Find in project dialog and click Find All.
- Leave the Replace in project dialog box empty and click Replace All. Confirm by clicking OK.
- Type */ in the Find in project dialog and click Find All.
- Leave the Replace in project dialog box empty and click Replace All. Confirm by clicking OK.
- Type #Pass 01 in the Find in project dialog and click Find All.
- Type /* in the Replace in project dialog box empty and click Replace All. Confirm by clicking OK.
- Type #Pass 02 in the Find in project dialog and click Find All.
- Type */ in the Replace in project dialog box empty and click Replace All. Confirm by clicking OK.
The .avs files should now look like this:
mpeg2Source("D:\DS9\DS9 S01E01\VTS_01_1.d2v")
SetFilterMTMode("DEFAULT_MT_MODE", MT_MULTI_INSTANCE)

/*
tfm(d2v="D:\DS9\DS9 S01E01\VTS_01_1.d2v", output="tfm.txt")
tdecimate(mode=4, output="metrics.txt")

*/

tfm(d2v="D:\DS9\DS9 S01E01\VTS_01_1.d2v", input="tfm.txt")
tdecimate(mode=5, hybrid=2, cycleR=1, vfrDec=0, input="metrics.txt", tfmIn="tfm.txt", mkvOut="timestamps.txt")
QTGMC(Preset="Very Slow", InputType=2, SourceMatch=3)
Crop(8, 0, 704, 480).BilinearResize(640, 480)

Prefetch(4)
Repeat 13 to 345 more times 😕
STEP 7 (Video Enhance AI)
Upscale 225% using Artemis Medium Quality, no grain, and export as PNG image sequence.
Now the meat and potatoes. This section will require some experimentation on your part to find the model you like most. They are updated frequently and each have their strengths. Older Artemis models made everything look very plastic but newer versions do quite well at bringing out details while cleaning up the the poor quality DVDs artifacts and benefit from being pretty speedy.
Some swear by Gaia-HQ and won’t hear anything about the Artemis models, but I found them a bit too hit or miss for my taste. I have experimented a bit with the new Dione models meant for deinterlacing as well. Most Dione models double the framerate which we can’t use but one model meant for DVDs does not. I figured as it was trained on DVDs it would be good at bringing out detail in DVDs and I have found that it does but occasionally looks a bit over sharpened and has some glitches with blur in its initial releases.
Another approach is to upscale in multiple passes. Do one pass at 100% to clean up the original and then a second pass to upscale. Or you may even find that the upscale doesn’t add enough from your viewing distance to make a difference and the 100% pass denoise/deblock pass is enough of a restoration for you. The permutations are endless.
All that being said I have been using one 225% pass of the Artemis-MQ v11 model. From the viewing distance in my livingroom I find it cleans up the DVD’s poor quality but not overly so. It also doesn’t accentuate artifacts that Artemis-HQ occasionally mistakes as details.
For output format I use PNG (8bit lossless). I have experimented with exporting to ProRes and MP4 but the reported frame counts of the exported files don’t match up with the AviSynth input. This leads to audio sync issues when multiplexing. So to be sure each frame survives the export process I use PNG.
A note on storage. I am using a 1TB SSD and for this step of the process I can batch upscale about 5 episodes at a time before my drive fills up to much for the remaining steps.
A note on opening .avs files in VEAI. You cannot open them through the program’s dialog box. You can only drag and drop them onto the program. Additionally, upon initial installation VEAI won’t recognize .avs files being dropped on it. After closing the program and reopening however it will accept them.
So to recap, my current export settings are:
- VEAI Version: 2.0.0
- AI Model: Artemis Medium Quality v11
- Sizing: Custom Setting Scale 225% 1440 x 1080
- Grain Settings: Amount: 0, Size: 0
- Video Format: PNG (8bit lossless)
Each episode takes approximately 2hrs to upscale. I am getting about 0.1 – 0.15 seconds per frame speeds on my RTX 3070. You will also notice a timestamps.txt file has now been saved to the episode folder as well. This will be needed for the last step. Repeat 345 more times 😨
STEP 8 (Davinci Resolve)
Reassemble the PNG image sequence, add desired sharpening, export to DNxHR HQ at 29.97fps.
I find that the resulting .png files could use just a touch of sharpening. If you choose a different model or like the look of the files it is up to you whether to add sharpening or not.
- Click New Project and give your project a name. Click Create.
- Click the cog in the bottom right of the screen to open the Project Settings.
- Set Timeline resolution to Custom For 1440 x 1080 processing.
- Set Timeline frame rate to 29.97. (We’re setting it to 29.97 because this is the framerate the timecodes.txt file assumes and then indicates which frames are not at that framerate.
- Click Save.
- Select the Media tab along the bottom.
- Use the file tree to navigate to the folder containing the episode’s image sequence . You will see a file name with the beginning and ending frame number similar to [000000-065214].png.
- Drag the file from the top file browser to the bottom to add it to your project.
- Right click on the newly added file and choose Create New Timeline Using Selected Clips…
- Add a Timeline Name according to season and episode. Example: Star Trek Voyager s02e01.
- Repeat Media tab tasks for all the episodes you’ve upscaled in this batch.
- Select the Color tab along the bottom.
- In the preview window scrub the timeline to desired frame and change the zoom to 100%. The preview windows can be panned with the middle mouse button.
- Click the Blur tab (water drop and triangle icon) and lower the Radius slider to sharpen your desired amount. I use a setting of 0.46.
- From the Library section in the top right search for Sharpen Edges. Drag Sharpen Edges onto the node to the left labeled 01. Set Sharpen Amount and Sharpen Radius to desired amounts. I use settings of 1.000 and 0.020.
- In order to apply this correction to other timelines, once you are satisfied with your settings right click in the preview window and select Grab Still. A thumbnail will appear to the left of the preview window.
- From the dropdown above the preview window select another episode timeline. Right click on the newly created thumbnail and select Apply Grade to apply the saved correction. Repeat this bullet for all episodes in this batch.
- Select the Deliver tab along the bottom.
- Select Custom in the Render Setting section.
- Set the Video settings to
Format: Quicktime
Codec: DNxHR
Type: DNxHR HQ
Resolution: Custom 1440 x 1080
Frame rate: 29.97 - Under Audio uncheck Export Audio
- Under File select Filename uses: Timeline name.
- Click Browse then select the folder for this episode.
- Click Add to Render Queue. The job will appear in the render queue at the right.
- Select another episode timeline from the dropdown above the preview window, click Browse then select the folder for this episode, and click Add to Render Queue. Repeat for all episodes in this batch.
Once all episodes have been added to the Render Queue, select all episodes and click Render All.
- To save these settings click the three dots at the top right of the Render Settings section and select Save As New Preset. Give the preset a name and click OK.
Repeat 345 more times. 😤
STEP 9 (Handbrake)
Encode the file to HEVC for easier storage.
“Derek,” you may be saying, “why didn’t you export a final compressed file from Davinci Resolve and skip this step?” Resolves export settings are somewhat lacking when it comes to modern compression. It can export HEVC but only with the paid Studio version on Windows, and even then only if your GPU supports hardware encoding. So I decided to use Handbrake which can produce smaller equal quality files through software encoding rather than using somthing like NVenc or QuickSync. Most are familiar with Handbrake so here are the settings I use. The only really important setting is framerate. Open the .mov file exported from Davinci Resolve in Handbrake with the following settings:
- Summary
Format: MKV - Dimensions
Width: 1440 Height: 1080
Cropping: Custom: 0, 0, 0, 0 - Filters: Turn all off
- Video
Video Codec: H.265 (x265)
Framerate (FPS): Same as source <—– IMPORTANT
Variable Framerate
Quality: 21
Encoder Preset: Medium
Save as a preset by clicking the Add button in the Preset section. Give your preset a name and click Add.
Click Start Encode and repeat for other files in this batch. You can add them to the render queue by using Add to Queue.
Repeat 345 more times. 🤬
STEP 10 (MKVToolNix)
Multiplex the upscaled video, extracted audio, and extracted timecode.
- Drag the MKV you exported from Handbrake and the matching AC3 audio file extracted by DGIndex into the Source files: field.
- Select the Video component in the Tracks, chapters, and tags: section.
- In the Properties section at the right, drag the timestamps.txt file for the episode into the Timestamp file: field.
- Check Fix bitstream timing info.
- Select a destination file (defaults can be set in MKVToolNix GUI > Preferences > Destination file name)
- Click Start multiplexing.
Repeat 345 more times 🥴
And Now The Conclusion
You have successfully upscaled your first Star Trek episode!
To recap:
Step 1: Rip to ISO with DVD Decrypter.
Step 2: Reauthor DVDs to individual episode folders with no compression or transcoding with DVD Shrink.
Step 3: Set .avs template options for two pass TIVTC.
Step 4: Index episodes, extract AC3 audio, and create .avs file with DGIndex.
Step 5: Run analysis pass in VirtualDub.
Step 6: Edit .avs files to remove first pass and uncomment second pass.
Step 7: Upscale episode with Video Enhance AI to PNG image sequence.
Step 8: Reassemble image sequence to video file in Davinci Resolve.
Step 9: Compress reassembled video to HEVC in Handbrake.
Step 10: Multiplex HEVC video, AC3 audio, and VFR timecode with MKVToolNix.
I hope this has been helpful and that you are well on your way to beautifully upscaled and cleaned up Deep Space Nine and Voyager episodes. Step 7 is an ever evolving step with new models, updated models, and new program features being added all the time. So do expect to want to redo seasons you’ve already completed. Please reach out if this has been helpful or if you have any suggestions or expertise that could speed up or improve on the process.
All my best 🖖,
Derek
6 Responses
I believe I’m going to give this a go with the show Sliders (1995). It was a great show (up until it became “War of the Worlds” humans vs kromaggs) that deserves to be preserved in its highest quality.
I heard that DaVinci Resolve’s “NTSC” aspect ratio is actually 9:10 (0.90:1). I read it in the manual and did some math. (4/3)/(720/486) = 0.9. The 486 is for captures of analog video (not DVDs) with the Blackmagic Intensity Pro 4K.
Oh wow, this sounds almost EXACTLY like what I’m trying to do, thank you! Everyone whose made a guide in the past either deIVTCs the 29.97 source material to 23.976 (blech,) or jacks the framerate up to 59.94 for the reasons you’ve mentioned, and neither of those options appeal to me whatsoever, so I’ve been looking for someone who had a guide for preserving the original variable framerate in the final output.
What I want to do differently, and could definitely use a little bit of feedback on/help testing:
1. Upscale to 2160p instead of 1080p. (Yes, I know this is going to result in a gigantic file size, but I’m expecting that.)
2. Use Apple’s ProRes codec (either the 422 HQ or 4444 variety, with 4444 XQ as a last resort) in place of DNxHR HQ out of Resolve, or possibly another editing program. Although I have access to other editing tools, my plan is to use an ExFAT formatted drive to dump the PNG files onto one of my Macs and let Resolve chew through the encode on one of them.
3. I know this will increase the render time out of Resolve, but I’d like to avoid cropping in AVISynth+ and instead do my cropping in Resolve as you did originally. My reason for this is that, as you’ve noted, a center crop isn’t always going to have clean edges, especially in the earlier seasons, and I don’t mind scrubbing through each scene and nudging the image a few pixels to the left or right where needed to achieve a cleaner crop.
4. Skip Handbrake; there are several reasons for this, but the most important is that I absolutely despise the quality of Handbrake’s encodes, and have found that even when using identical codecs as other software, (e.g. FFMPEG,) Handbrake produces inferior results. Even more importantly though, my end–goal is to shove the giant ProRes output into the MKV and have the ProRes footage and both of the original audio tracks available to me with the correct variable frame rate. I know I’m looking at hundreds of gigs for each season, and easily a few terabytes worth of data once all is said and done, but there’s a method to my madness. ProRes is a really awesome archival–level codec, which is exactly what I want for this project. Depending on what I want to actually watch the episodes on, I’m going to need to transcode/recompress them to a few different formats. (e.g. Apple’s devices love 8–bit HEVC, but my XBox 360 only wants h.264.) Likewise, HEVC/H.265 is still seeing improvements, and even H.264 occasionally gets a revision that results in a better output. As a result, I would much rather archive huge ProRes files with 2160p footage and just transcode them to H.265 or H.264 when needed than go through the whole upconversion process again when either codec sees a quality improvement as the years go on, or just as plausibly, when H.266/VVC or AV2 are released, especially if either of them see widespread adoption. Thus my plan will be to create a master MKV file, and then transcode that into an MP4/MOV with H.265 or H.264 as needed.
5. Output the aforementioned compressed file via FFMPEG on one of my Macs. While I’ll be using a Windows machine for the upscaling portion of the process (mostly because I can’t figure out Vapoursynth and the Mac port of AVISynth requires homebrew, which I’ve found to be a titanic headache,) I have a couple of old Macs that are more than adequate to transcode video while I’m doing something else. Likewise, the Windows machine I use for VEAI exists solely to deal with VEAI anyway, so I have no problem letting it take its time with upscaling while I’m doing something else.
Finally, and I know this has been a long comment as I really like what you’re doing here, I just want to point out one thing that’s driving me nuts given my background in video. You’re using the term PAR correctly as in Pixel Aspect Ratio, but you’ve unfortunately got SAR all wrong. SAR is the *Storage* Aspect Ratio, not the screen aspect ratio; the term you’re actually looking for is DAR, or *Display* Aspect Ratio. (More on that in a second.) I might not have mentioned this above, but like you, I intend for my final files to have a DAR of 1:1, and technically a SAR of 1:1 as well. Now at this point you might be wondering why this difference is important, and the short answer is that when the SAR and DAR are the same (e.g. Both 1:1) it’s not. However, we’re dealing with DVD source material, and that’s where things can get tricky. DVDs technically use a SAR of, get ready for it, 3:2. Their SAR is always 3:2, hence the 720×480 frame size. (I won’t bore you with why 3:2 is used, but just know there is a reason why it was chosen, it wasn’t arbitrary.) To have a DAR of 4:3 and 16:9 though, other tricks had to be used, namely changing the pixel aspect ratio as you described above. Thus, our source material for Voyager and DS9 have a SAR of 3:2, a PAR of 0.91, and a DAR of 4:3. I realize this is minor, but figured it was worth mentioning, as the three different types of aspect ratios can be extremely confusing, especially to people who are used to dealing with modern pixel–mapped footage.
Thanks for all the great info Alex! I don’t see why you can’t use ProRes out of Resolve instead of DNxHR. I will note that when I tried to export directly to ProRes from VEAI the framecounts got messed up so it would just be a matter of giving it a try and then making sure everything matches up.
I would encourage you to test upscaling to 1080p and 4K and see if you can see any difference. When I did I found that there is definitely a limit to what can be achieved from the DVDs and for me the 4x render time and storage requirements weren’t worth the negligible differences.
I will definitely give other encoding options a look. I’ve switched to 10-bit HEVC as the shadows don’t get as blocky. I have also discovered I don’t need the DVD Shrink step and can rip episodes directly from DVD Decrypter so it’s an ever evolving process to be sure!
Hi, I think your post is quite detailed and helpful. I want to know some further details about it and would you like to talk about that with me? This is my email address: mollyqmc@163.com
Great stuff. This process is similar to mine for VHS restoration and I learned a few new things in this post to streamline. Still testing VEAI models. Thanks for the detailed post.